
Burning incense has been a beloved practice in many cultural and religious ceremonies for thousands of years. The practice has grown in popularity, and if you (like me) use incense at home, you might wonder if you can make tea versions. If this sounds like an intriguing, creative, and very personal way to make the most of your tea, read on. Let’s explore this interesting use of tea leaves together.
Tea leaves can be used to create a custom incense. You will need tea leaves, a binding agent, and either water or oil. In addition to tea leaves, you can add herbs, flowers, and spices. You can create loose incense or shaped incense such as cones or sticks.
Using tea leaves can be an excellent way to create a customizable incense to burn. The fragrant herbs and spices that are used in tea can produce very appealing and relaxing aromas.
And, you might be surprised at how simple a process it is to turn your favorite tea blend into a new incense.
You may also want to read my article How to Grow Camellia Sinensis Indoors? A Step-By-Step Guide if you want to also take on the project of growing your own tea plant at home.
“Tea leaves can be used to create a custom incense. You will need tea leaves, a binding agent, and either water or oil. In addition to tea leaves, you can add herbs, flowers, and spices. You can create loose incense or shaped incense such as cones or sticks.”
TEA CROSSING
A Simpler Option: Japanese Cha kouro
Before we dive into the process of making actual incense with tea leaves, I wanted to let you know about another way to use your tea leaves as incense: Japanese Cha kouro.
Can You Burn Tea Leaves as Incense?
Short of combining the necessary ingredients to mix, knead, and potentially shape your tea leaves into incense, you can simply warm your leaves.
A Cha kouro (or Cha-kouro or Cha-koro) is a Japanese tea leaf burner. It is designed with a base for holding a small candle such as a tea light, topped with a tray or small bowl for tea leaves.
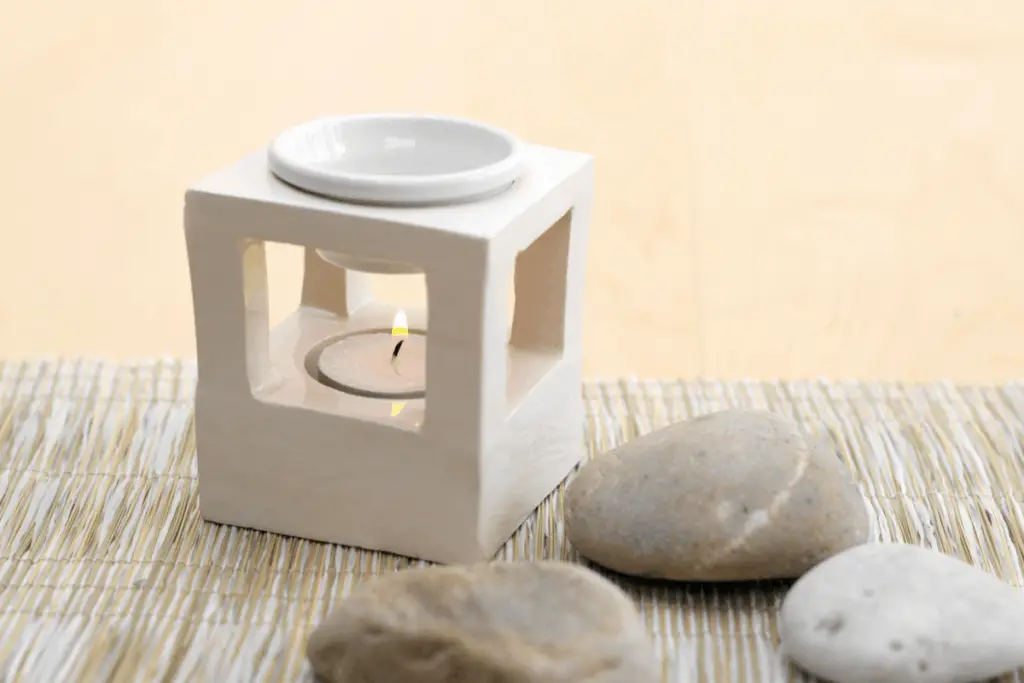
If you want to release the aroma of your tea leaves and other aromatic material such as herbs and flowers, but don’t quite want to jump into the process of making your own incense, try this as a first step.
Cha kouro gives you an opportunity to warm any type of tea leaves or combination you create, including coffee beans.
The gentle warming releases a soft aroma and is a great place to begin.
Now that you have an authentic, simple way to use your tea leaves in an aromatic way, let’s move on to the process of actually making your own incense.
Make Tea Incense with 3 Basic Ingredients
Making your own custom-blend incense with tea leaves can be an interesting and creative way to have an entirely different yet deep relationship with your tea.
In general, the three ingredients you need to make your tea incense are:
- Aromatic plant material such as tea
- A binding agent
- Liquid: water and/or oil
I will cover each of these ingredients later in the article, but for now, let’s just get an overview of the basics.
Aromatic Plants
The aromatic plant material can come from a variety of sources, such as herbs, spices, and seeds, and in this case, you’ll be using your favorite tea blend, which means your options are virtually limitless.
You could opt for more heavily spiced chai, citrus, or floral blends, or even an original mix of your own.
When selecting your tea, be sure to buy loose tea with larger dried pieces of tea leaves and other ingredients. While you will need to turn these ingredients into a powder, you want to start with the freshest and highest quality tea blends to ensure that your final incense has the full, rich scent you are hoping to capture.
Binding Agent
Next, the binding agent, which can often be a botanical gum or resin helps to incorporate and hold together the incense, which is what allows it to hold a particular shape and prevents its collapse and breakdown as it burns.
Liquid: Water or Oil
Finally, the liquid you add, either water or oil, will help make your initial incense mixture more pliable, which will allow you to mix it by kneading to ensure uniformity as well as to shape the incense into different forms.
An Optional Ingredient: Incense Base
In addition to these three basic ingredients, you can also add an incense base, which will usually be in a powdered form. The purpose of the base is to help maintain the burning of the incense, as some herb and spice mixture will not sustain a flame consistently.
This ingredient isn’t an essential part of your mixture because many of the herbs and binding agents (like powdered agar) that you can use will often serve this purpose.
If you decide to include an incense base in your mixture, it can certainly help your incense burn more evenly and for longer periods without needing relighting.
Keep in mind is that adding these additional materials will likely change the overall aroma of your incense. It may not be a bad thing at all. In fact, it might just add an extra lovely dimension to your incense. Just know that various combinations will affect the final result.
Choose One of These Three Easy Forms of Incense
If you haven’t used or seen homemade incense often, the form you’re likely most familiar with is the incense stick. These are the types that are most often sold commercially, as they incorporate aromatic wood sticks that allow mass production companies to cheaply and easily add to the smell.
Generally speaking, the three basic forms of incense you can make are:
- Loose incense
- Incense cones
- Incense sticks
As I will cover later on, making your tea incense will provide you control over the quality and type of ingredients that you’re burning in your home, which can be a much healthier and safer option for you long-term.
The importance of using the right materials in your mix applies to all three forms of incense. Also, the basic steps for making these forms are essentially the same.
However, of the three, loose incense is the easiest to produce.
As we go over the process to turn your favorite tea into your brand-new incense, I’ll highlight the differences in the overall process of producing each form of incense.
Additionally, there are advantages and disadvantages to whichever one you choose to use, so consider the tips I include when deciding which one is right for you.

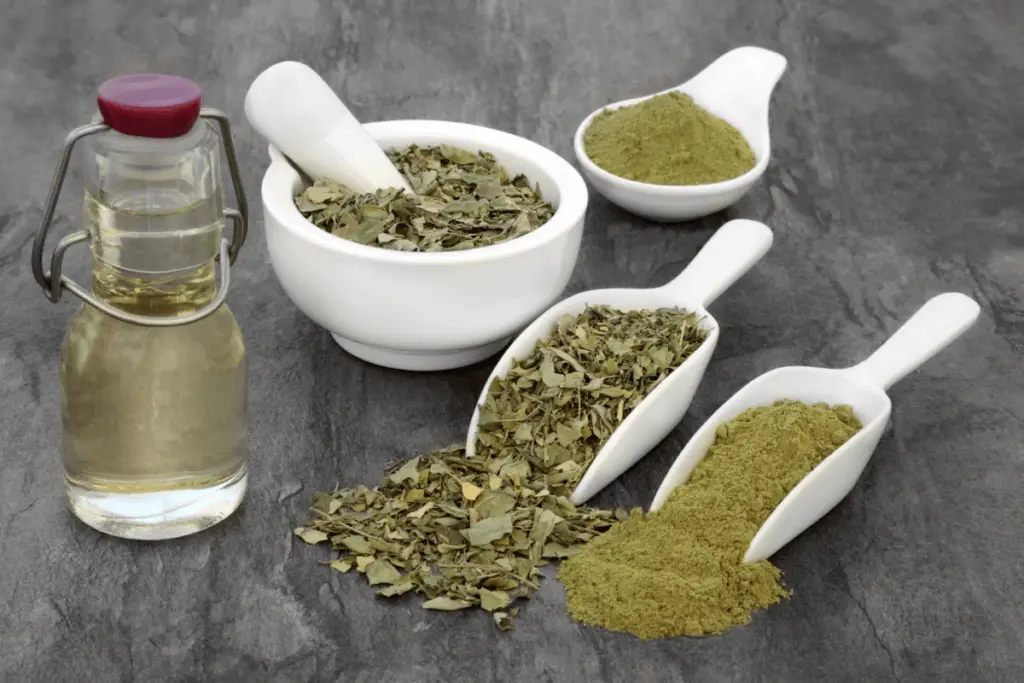
Step #1: Grind Your Tea Leaves into a Powder
To evenly burn and access the aromatic compounds within your tea leaves, you’ll need to thoroughly grind the tea leaves into a relatively fine powder.
The best way to do this is to use a mortar and pestle.

This part of the process can take some time, especially if the tea mixture you’re using has particularly large or unbroken pieces of tea leaves, herbs, and spices.
You can speed up the grinding step by first using a coffee grinder, which can help blitz and chop up larger pieces.
Another way to make sure your tea leaves grind properly can be to partially grind them, leave them in the open air to dry, and then grind them again after a few hours or days. This might seem counterintuitive, as in a later step we’ll be reading moisture to your tea incense mixture.
It’s important to get the initial aromatic material ground as finely as possible and working with dried herbs and spices is the best way to achieve that.
Often, tea blends are a mixture of multiple aromatic plant materials, and by grinding these materials finely, you’ll ensure that they are evenly mixed.
This way, when you add the binding agent and liquid in later steps, it will be easier to ensure that everything is consistently incorporated. This will translate to a final incense product that burns consistently and produces a steady, unchanging aroma rather than burning portions with different scent profiles due to poor mixing.
Should You Add Charcoal to Your Mixture?
During this step, charcoal is often added and ground into the mixture, and that’s an ingredient you’re likely to find in many homemade incense recipes online. Many people enjoy the smoky smell that it adds to their incense but adding this powder may not be a good idea, especially if you plan to burn your incense indoors.
When burned, charcoal can produce carbon monoxide. When burned outside, this potentially harmful gas will easily dissipate into the atmosphere, which is why it’s perfectly safe to use a charcoal grill outdoors, for example.
However, when you’re inside, the enclosed environment can allow carbon monoxide to build up, which can be bad for your health and potentially life-threatening, depending on the amount of charcoal you’re burning, how long it’s left burning, and how small of a space you’re in.
Another consideration is that burning charcoal can be bad for the environment since it produces carbon emissions. By burning the charcoal, your contribution to overall carbon emissions is arguably very small, but if you plan on using incense often and maintaining environmentally friendly habits is important to you, leaving charcoal out of your incense is something you should consider.
Step #2: Mix the Ground Tea with Your Binding Agent
The next step in making your tea incense will be to add a binding agent, which can often be a plant gum or resin.
Specifically, commonly used binding agents often include:
- Brewer’s yeast
- Agar gar
- Guar gum
- Gum Arabic
- Locust bean gum
- Xanthan gum
Several of these options, including brewer’s yeast, agar-agar, and xanthan gum, may be available in powdered form at your local supermarket.
These ingredients are relatively affordable as they don’t make up a significant portion of the incense mixture and are made completely from plant material.
During this step, you can also add your base if you choose to use one.
If you choose to use a base, it’s important to keep track of the ratio of powders that you’re adding. You can do so either by using measuring spoons (i.e. teaspoons, tablespoons), although using a kitchen scale can be a more reliable way to keep track of the amounts of each type of powder you’re adding.
Writing down the powder amounts you use will allow you to keep track of and replicate and/or adjust your incense recipe as you customize it to your preferences.
A good rule of thumb to follow is that your mixture should be made up of about 80% aromatics, which in this case would be your ground tea blend.
The other 20% of the mixture made in this step would be made up of your binding agent and/or incense base. If you’re using a binding agent that doubles as a base, such as agar, you can simply calculate the volume or weight of binder needed to equal 20% of your tea powder.
On the other hand, if you want to add both a binding agent and a base, try an initial recipe that uses 4 times as much base as the binder, as only a small amount of binding agent is necessary to hold your incense mixture together.
In contrast, if you’re relying on a separate base, it’s better to have more of it in your mixture to ensure an even, smooth burn.
Step #3: Slowly Add Water to Your Mixture
Now that you have the basic incense powder mixture, it’s time to add moisture. When you add water, you want to produce a moldable, clay-like material.
You won’t need a lot of liquid to achieve this, so be sure that you don’t add water too quickly to your powder mixture.
If you add too much liquid, you’ll either have to go back and add more powder to even out the mixture or you’ll have to wait several days for the mixture to dry out before you can proceed to the next step in the process.
You can use a dropper to add water so that you have complete control and don’t risk adding excess water.
Be sure to continuously mix the powder and water as you add it, as this will make it easier to ensure an even distribution of all the material in the final incense mixture.
Once you’ve achieved the right consistency, which should be similar to Play-doh, you’ll be ready for the next step.
If you decide you want to make the simplest form of incense, loose incense, this will potentially be your final step, as you won’t need to form the clay-like incense mixture into different shapes.
The purpose of adding water is to activate the binding agent and to produce an incense that can fully incorporate the aromatics and any incense base used and, if necessary, be formed into either incense cones or sticks.
However, water isn’t the only liquid that you can add to your mixture. Many people choose to add aromatic oils to the incense mixture to produce a more complex scent profile and for reputed health and spiritual benefits as well. Essential oils are a popular choice, and you don’t need to add very much of them to enhance or transform the scent of your incense.
Adding Oils Can Further Customize Your Incense
Adding oils to incense appears to be a bit of a modern twist on incense recipes, which traditionally usually only consisted of the ground plant matter that we added in the first step.
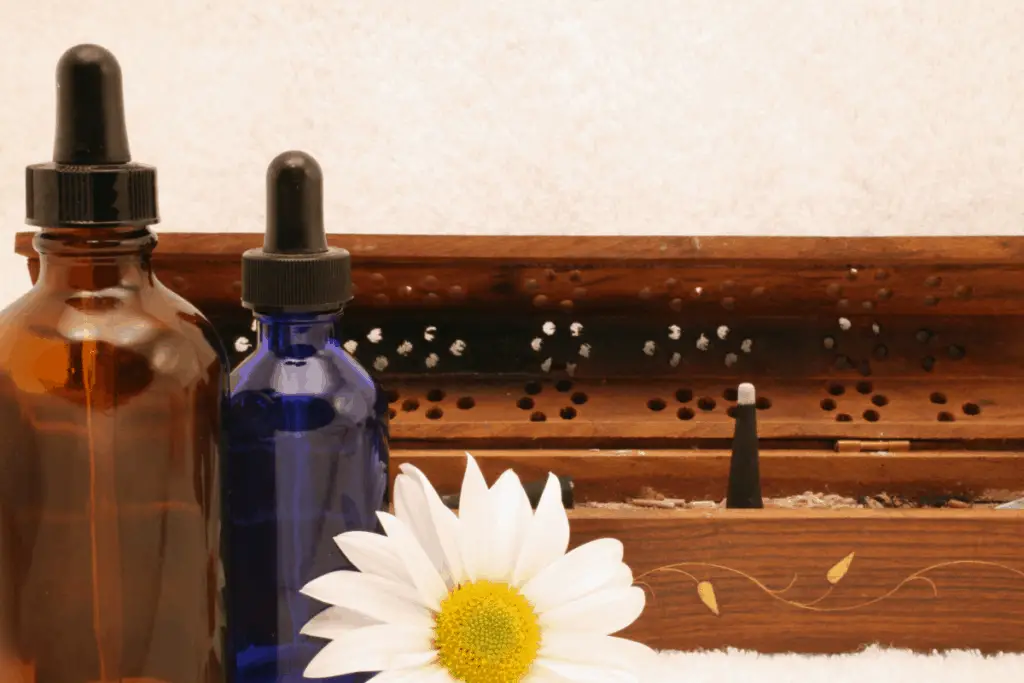
In the past, many cultures have treated incense burning and oil burning separately, as combining the two can produce quite a different result.
Regardless, adding oils, particularly essential oils, has become a popular practice.
As in many other uses, essential oils, which have very potent aromas, can’t be applied directly or alone into an incense recipe. If added directly to the powdered ingredients, drops of essential oils would be quickly absorbed into whatever parts they touched first.
How to Incorporate Essential Oils to Loose Incense
Adding essential oils directly to loose incense would inevitably result in loose incense that has chunks and clumps with markedly different aroma mixtures than the rest of the recipe, which wouldn’t be an appealing product to use, at it would burn and produce scents unevenly.
As in other uses, essential oils used in incense need to be dissolved in a carrier liquid. Essential oils do not dissolve in water and would only separate from any water-based mixture, which is why you should avoid adding water if you want to add essential oils directly to your powdered mixture to produce a loose incense mixture.
A common way to dissolve essential oils is to use other, less aromatic oils as the carrier liquid. But, it’s important to note that most vegetable, nut, and seed oils that are commonly used as carriers for essential oils will not incorporate properly into the dry, powdered incense mixture. Additionally, they won’t allow incense to burn properly, as they give off smoke that can be potentially harmful to breathe consistently.
As such, unlike in other instances where a carrier oil is the best way to dissolve and use essential oils, they are best avoided in your recipe. Fortunately, most essential oils can also be dissolved in alcohol. The best alcohols to use are high proof ethanol alcohol, as the alcohol content needs to be high enough (95% and above) to properly dissolve the essential oil droplets.
Once a few drops of your chosen essential are dissolved in the alcohol, you may have to wait up to an hour to allow the two liquids to fully mix, although you can stir to speed up the process. Then, you can mix the essential oil-infused alcohol with your dry incense mixture, and any excess alcohol will evaporate and leave you with a final mixture a bit dryer than the normal clay-like mixture made with water.
Choosing the Right Essential Oils for Your Tea Blend
There are many popular essential oils to choose from, and many people who choose to incorporate essential oils in incense will use multiple oils in a single recipe.

If you’re eager to get started adding essential oils to your incense, consider some of these popular choices:
- Lavender oil
- Jasmine oil
- Eucalyptus
- Peppermint oil
- Chamomile oil
- Lemongrass oil
- Patchouli oil
- Pine oil
- Sandalwood oil
- Cinnamon oil
- Vanilla oil
- Rose oil
- Frankincense
Some scents, like lavender, jasmine, eucalyptus, and chamomile are renowned for their relaxation-promoting properties, and people often use them to promote sleep and deal with stress. Other essential oils like sandalwood, pine, and patchouli add a deeper, woody scent that many people find comforting and freshening in their homes.
If you’re unsure of where to start or simply want a more straightforward way to get these scents in your incense, try looking for tea blends that already incorporate any of the scents above that interest you. Then, you can decide if you even need the added potency of an essential oil.
Safety with Essential Oils
Whatever essential oils you choose to use, there are many touted mental health and stress-relief benefits that you may experience, but exercise some caution about how you use and store them in your home.
For example, avoid using high amounts of lavender, eucalyptus, and tea tree oil, as there has been some research indicating that they can release gases that are harmful to breathe in.
Essential oils can be irritating to the skin since they are highly concentrated, so make sure to clean the area where you use the oils and wash your hands thoroughly afterward.
Additionally, several popular essential oils can be harmful to pets, including:
- Menthol
- Nutmeg
- Clove
- Cinnamon
- Tea Tree
- Lemon
- Orange
- Pine
- Eucalyptus
Be sure to research the essential oils you are planning to include in your incense, as some are not contact-safe for pets while others have scents that are too sharp for cats and dogs to smell.
Depending on the restrictions of use, you may have to exclude certain oils for the safety of your pets, be careful about storage, or simply make sure to only burn your incense in a well-ventilated area.
Step 4: Knead the Incense Mixture
Once you’ve added the right amount of moisture to your powdered mixture, you’ll need to do one final mix to ensure that all the ingredients are fully and evenly incorporated, and this time you’ll be using your hands.
Much like you would with bread dough, the clay-like incense mixture will need to be kneaded by hand for at least a few minutes. Once you’re happy with the consistency of your mixture, you can move on to the next step.
However, if you’re planning to make loose incense, congrats! You’re already done making your first tea incense. Be sure to have an appropriate container that will keep your incense from losing potency, as incense not stored properly can become less aromatic over time.
Loose incense can be placed on a heat-safe dish. That dish can then be placed above burning charcoal in an incense burner. As we discussed previously, it’s important to make sure that you’re in a well-ventilated area if burning charcoal.
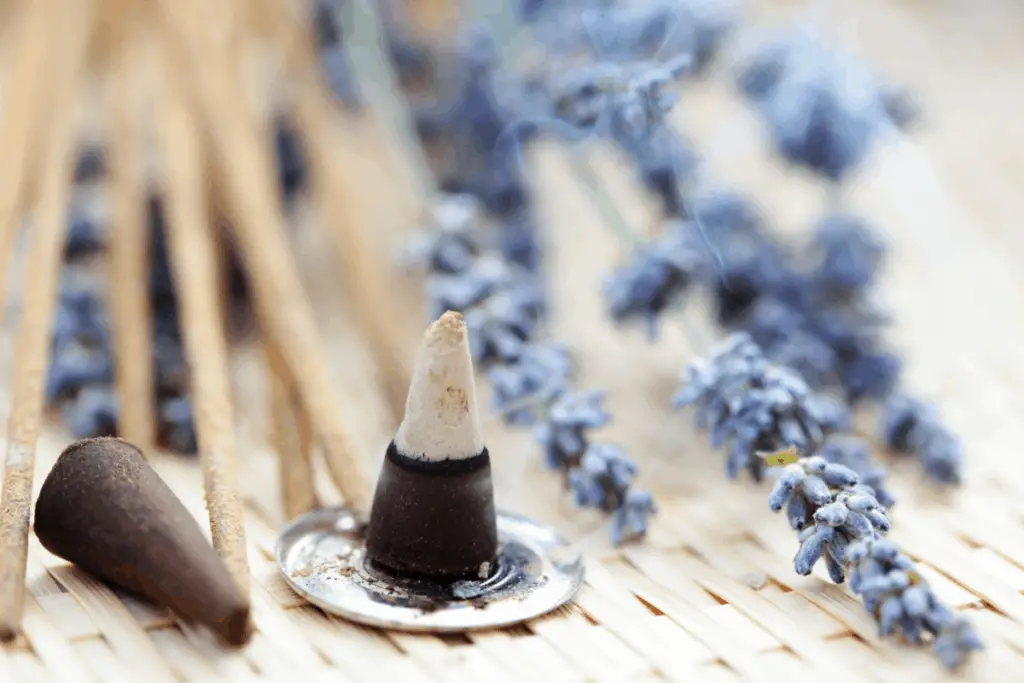
Step 5: Form Your Incense Mixture into Your Desired Shape
If you plan on making either incense cones or sticks, this step is where you’ll form the clay-like mixture into the appropriate shape. Forming the cones is simple enough, and it’s just a matter of taking the right amount of the mixture and pinching and rolling it into a small cone.
On the other hand, when making incense sticks, you’ll need to form and squeeze a thin layer of the incense mixture around about ¾ of the way down wood sticks made for incense burning, which are often made of bamboo, sandalwood, cedar, and pine.
Each type of wood will add a different scent to the overall incense aroma when burned, and you can also customize the scent by soaking the wood in essential-oil infused alcohol before molding the incense mixture onto the stick.
Step 6: Prepare Your Incense for Drying
After you’ve molded your desired shape, your incense cones or sticks will need to dry to ensure that they burn properly, as any leftover moisture will slow down or prevent burning.
A great way to ensure that any moisture is completely evaporated is to leave the incense cones or sticks on wax paper or drying rack (for incense sticks) and rotate them after 6 to 12 hours, depending on how long the overall drying process takes.
If you make larger/thicker cones, the drying process can be much longer, as evaporation from deeper parts of the clay-like mixture will occur much more slowly. In such cases, the drying may take several days, so if you’re eager to get started burning your incense, try making smaller, less dense cones or sticks.
The Difference Between Incense Sticks and Cones
Once you’re satisfied that your new tea incense cones or sticks are fully dried, you can start to use them. When comparing the two forms of incense, one of the biggest differences is how quickly they burn.
Incense cones can be directly ignited, and they tend to release large amounts of aroma at once.
A standard size incense cone would generally burn for less than 30 minutes. In comparison, incense sticks, which are lit at the tip of the stick while it’s standing up in a glass jar or other safe container, burns slowly, releases a more subtle amount of aroma and could burn for close to an hour.
At the end of the day, whatever form of incense you choose to use, you’ll have a handle on the incense making process and a recipe that you can build on a tweak if you want to make improvements.
As long as you make sure to use good ingredients, practice proper incense burning safety precautions, and keep track of your recipe, you’re sure to have the start of a productive new hobby and wonderful new tea incenses to enjoy.
Step #7: Start Enjoying Your Incense
After your incense has been drying for some time, you’ll need to check if it’s fully dry. With cones, you’ll want to see if the incense is hard and smooth to the touch, as it should dry into a relatively solid state that shouldn’t crumble under slight pressure.

In comparison, for incense sticks, if you pick them up, look to see if the incense seems to droop, bend, or separate from the sticks in any way, as the drying process should have helped them adhere and solidify fully around the sticks.
You want to avoid any separation between the incense mixture and the wood stick, as they need to burn together to produce the full scent, and it would generally be surface for a burning piece of the incense to fall off and separate from the rest of the incense stick and land on another surface in your home.
Your Homemade Tea Incense Is Likely Better for You
Beyond simply making a highly customizable incense aroma for you to enjoy, the second step in this process is really where homemade tea incense making shines. Although buying cheap incense products may be faster and easier, it’s not necessarily the best option.
Often, companies that produce incense products on a mass scale, especially incense sticks, will use cheap materials in their incense recipes to maximize their profits as much as possible.
As a result, a lot of the aromatic materials and binders used in commercially available incense products will be made from synthetic materials, resulting in a less aromatic and potentially unsafe product.
By selecting your own ingredients, including the tea blend that will serve as your aromatic material, you’ll have full control over the quality and the safety of what you’re burning in your home.
While deciding what tea blends to use, look for reputable brands that offer organic blends, as the potential pesticide, herbicide, and other chemical residues are not something you want wafting through your home.
Some popular brands that offer unique organic blends include:
- Harney & Sons
- Smith Teamaker
- Pukka Herbs
- The Republic of Tea
- Numi